

For once and for all, let’s iron out the kinks of what goes into a proper slow-motion video clip. As a stock media content creator, I have to admit that I had a hard time cracking the ins and outs of slow-motion footage. There are many things to keep in mind like shutter speed related to high frame rate, stretching the clip on the timeline, conforming the clip to a 24 fps timeline and so on (conf-what?). It gets overwhelming quite fast. Understanding slow-motion shouldn’t stay in the way of creating beautiful footage that you can sell on stock footage agencies. Let’s get that sorted once and forever, so watch, and read on!
Frame Rates For Slow-Motion
Arguably the most important ingredient for slow-motion footage is having a camera capable of recording footage at a high frame rate. Since you will slow down the movement by stretching the clip in the timeline, you’ll need more frames per second to document the capture. In this day and age almost every camera, including the smartphone in your pocket (or table), records some sort of high frame rate. By high frame rate, I mean a frame rate that’s typically higher than the base frame rate used for normal speed motion which varies between 23.976, 24, 25 and 30 frames per second (fps). The base frame rate is usually the standard rate that we watch movies, on TV or cinema screens, computers, and mobile devices.
Common high frame rates you’ll find on these devices may vary between 50 to 240 fps and anything in between.
Why High Frame Rates?
Imagine that a rubber band is your video clip recorded at 24 frames per second, where each black mark is one frame. When the clip is not stretched, (i.e at its normal standard rate of 24 fps), the clip will playback at the normal speed of 100% on a 24 frames per second timeline (or 23.976, or 25 fps). This is how most of your standard speed footage should reside on your base project frame rate. That’s why it is recommended to work with a project (timeline) base frame rate that matches the frame rate of the majority of your clips.
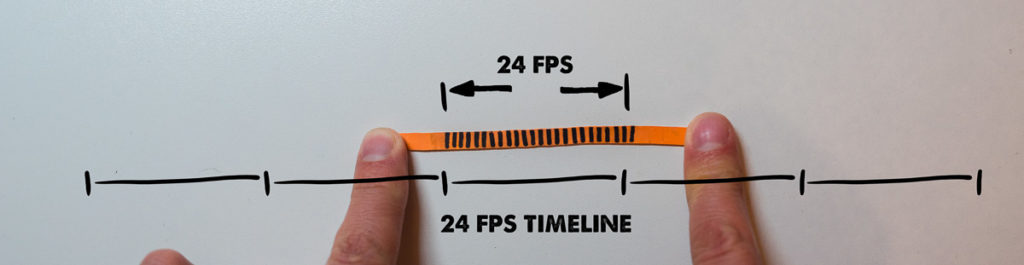
But you might get the idea (rightly so) to slow down the movement on a certain clip that was initially recorded at a normal fps. So you stretch it to let’s say 50% of the normal speed then you play it back at the standard project frame rate of 24, and obviously results are not what you expected:
While the movement slowed down, the flow looks choppy and unnatural. This is simply because the clip was stretched out on the 24 frames per second project frame rate, and now there are gaps between the frames since there are 24 frames spread on a longer time unit.

The program will try to fill these gaps with frame duplicates or computer-generated frames blending giving way to all sorts of jitters and artifacts. It gets complicated.
How To Get Smooth Slow Motion?
The solution to getting a smooth, flowing slow-motion movement is to plan on shooting your footage with a higher frame rate than the base frame rate. I won’t go into detail on what frame rate works for what situation since Brandon Li explains this extremely well in his video on frame rates:
Shutter Speed vs FPS
The only thing I’ll touch on before diving into post-production is shutter speed. There’s a certain relationship between your camera’s frame rate and shutter speed that results in an acceptable motion blur. It’s more complicated than this, but it has to do with the motion blur we were accustomed to watching Hollywood movies.
This is important to keep in mind since not having the right shutter speed might result in something called ghosting, or hyper-realistic motion blur.
The easiest way to remember this is to keep your shutter speed at double your frame rate. For instance, here I recorded this clip at 120 frames per second so that means that my shutter speed should be at 1/240. I don’t have that particular stop value on my Sony a6500 so the closest available is 1/250th. The same rule should apply for standard frame rates like 24, 25 or 30 unless you are going for a more stylistic, gritty look like that of Saving Private Ryan, where dust particles, splatters, and grit were amplified by the lack of motion blur.
Editing Slow-Motion
In the example here I am using DaVinci Resolve but the same principles apply for any NLEs you happen to be working with (Vegas, Final Cut, Premiere Pro, etc.).
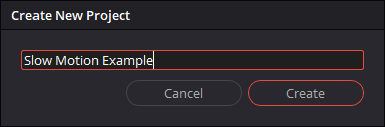
Start by creating a new project
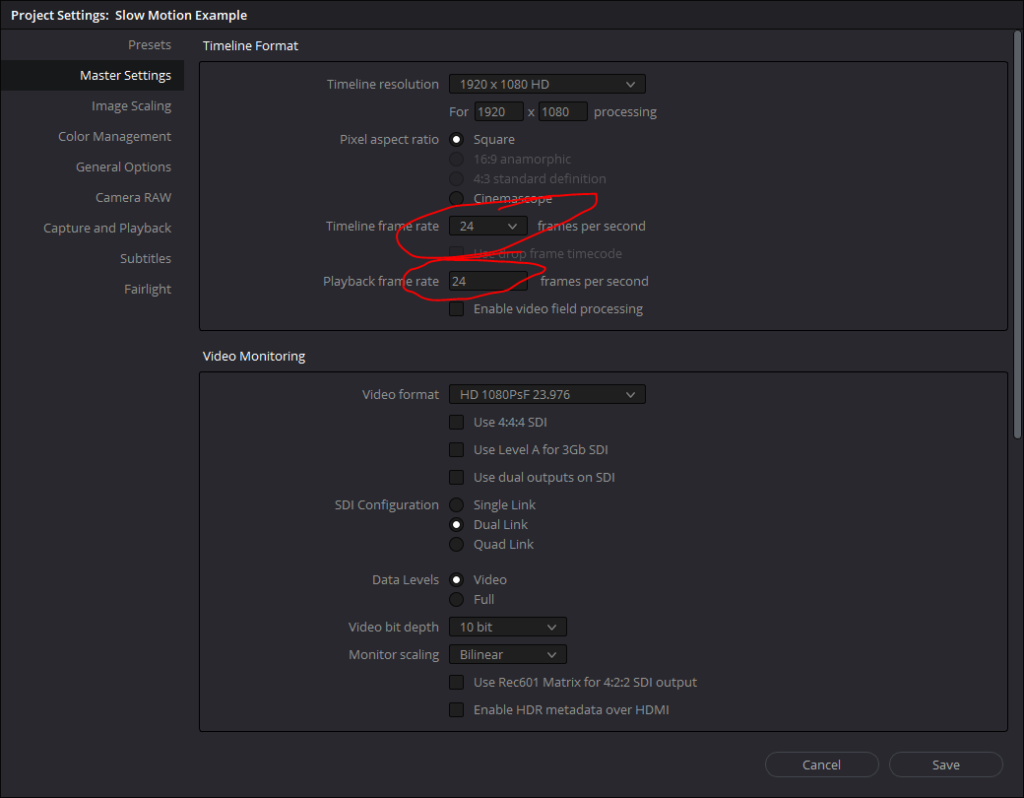
This next step is very important since we won’t be able to change this later. Make sure to set your Timeline Frame Rate to one of the standard values you intend to work with. It always helps to know the end media target you are creating your movie for. In my case, I’ll just leave it at 24 frames per second since my movie will probably live somewhere online.
I’ll be importing the footage from a shoot that has clips with various frame rates – some at 24 and some at 60 frames per second. We’ll just grab them all and import them into the media pool.
Resolve is telling us that our imported batch has clips with different frame rates and asks us if we want to change the initially set timeline frame rate to match the clips frame rate.
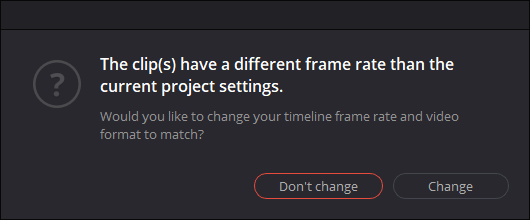
This is another important step to keep in mind. If I choose CHANGE, my timeline resolution will be set to the clips with the highest frame rate (60 fps in my case) and Resolve won’t let me change that anymore. That’s not necessarily a bad thing but in that case, we won’t be able to manipulate the high frame rate clips and mix them seamlessly together with the 24 fps clips. So make sure to choose DON’T CHANGE to stick with the initial set timeline rate.
Conforming HFR Clips
With that out of the way, we can actually start editing and manipulating the slow-motion clips in a process called conforming. Conforming is simply the adapting high frame rate footage to fit a standard frame rate timeline so they playback at the project’s base frame rate (in my case 24 fps). Think of it as spreading the frames out by stretching which in turn slows the movement (as in the rubber band example above).
Since I am primarily a stock media creator, I would group the standard and high frame rate clips on their own separate timelines for an easy export organization.
Slow Motion Editing Workflow
Here’s my workflow for editing, adding and slowing down high frame rate clips to the timeline:
- Group all your high frame rate clips into a smart bin so you can have them separated from the other standard frame rate clips

- Select all clips in the bin you’ll be working with, right-click, select Clip Attributes and for the Video Frame Rate, select the project timeline frame rate you are currently working, in my case 24 frames per second. This will conform the clips to the proper timeline frame rate.


- bring up each clip in the source viewer by double-clicking on it in the media pool, scrub through the clip and choose the IN and OUT points by pressing I and O on your keyboard.
- drag the video-only part of the clip from the source viewer overlay onto the timeline since we won’t need the audio. You can also Alt-drag the video on the timeline. This will exclude the audio. Do this for the rest of the clips
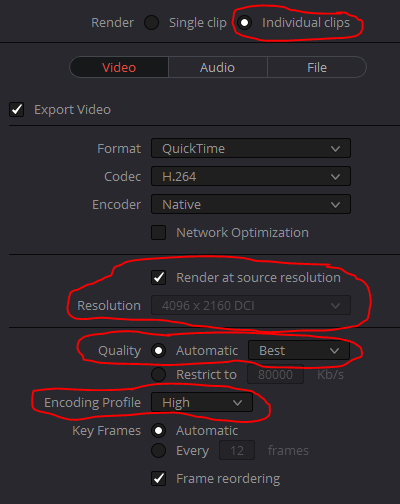
If I would export the entire timeline as an edit containing a variety of clips with different frame rates, audio, intended to be viewed as an entire unit, my export would need to be rendered as a single clip. For my specific use as a stock footage content creator, my workflow is geared to deliver individual clips to upload as shoots to stock agencies. So, in the DELIVER tab, select the Individual clips setting since I want the clips to be rendered individually.
Then choose the codec you want to export the clips with, and click Render at source resolution.
Unclick Export Audio in the Audio tab since we don’t want to export audio.
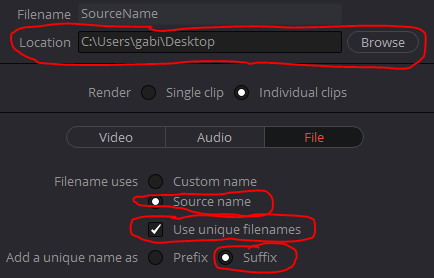
In the File tab, choose Source name, click Use unique file names, and choose Prefix or Suffix to make sure they are not overwritten when exporting clips from the same master source clip.
- In the Video tab choose the codec you want to export, in my case H264 with a Quicktime format, select Best for quality, Encoding Profile on high and click Render At Source Resolution to make sure you don’t accidentally downres or upres footage at the wrong resolutions.
- In the Audio tab make sure you have Export Audio unselected.

- In the File tab select Source name, Use Unique filenames and Prefix or Suffix. This will make sure you won’t be overwriting clips cut out of the same video source.
- choose a location for the exported clips, Add to render queue and start the render
And this is it, friends! It’s a long one but really it is easier than it seems after you go over it once or twice. Please leave comments or questions if you have any!